Review: Atomos Ninja V 4Kp60 HDR Monitor Recorder
By Adam Noyes
The Ninja V is a 1920×1080 HD monitor bright enough to reproduce 10 stops of exposure latitude and for outdoor use. It’s small enough to be attached permanently to a live producer’s video camera, and it makes shooting in HDR more predictable. As a recorder, it sees equal duty for higher-quality recordings that will be graded or keyed and also as a program recorder on live switches and webcasts.
The Ninja V is Atomos’ fourth 5″ monitor/recorder. The original Ninja was announced in 2010 and I first saw it at NAB 2011. By 2012, the Ninja II had already replaced the original Ninja. In 2014, the Ninja Blade replaced the Ninja II. And then it took over 4 years for Atomos to release the Ninja V. During this time Atomos released a dizzying selection of 7″ monitors in the Shogun, Inferno, and Flame lines. Some carried the Ninja name but none shared the smaller 5″ form factor. Was the wait for the Ninja V worth it? Read on to find out.
Monitor Specifications
The Ninja V (Figure 1, below) is a 1920×1080 HD monitor capable of 1,000 nits of brightness. This is bright enough to reproduce 10 stops of exposure latitude and for outdoor use. So while this is not a true HDR monitor and not as bright as the 3,000-nit Shogun 7, it is a marked improvement over using the LCD monitor on a video camera or DSLR or compared to the older Ninja Blade.

Figure 1. The Atomos Ninja V. Swipe to access additional monitoring tools, including the zoom and framing guides.
Do note that this is not a 4K monitor, although it does support displaying 4K resolution inputs in HD, either scaled to show the entire image or in 2:1 or 1:1 zooms to punch-in and check focus. As a monitor, the Ninja V is very similar to the Shinobi, but the Ninja V adds a built-in 4K recorder.
Bits and Sampling
Atomos recorders have always supported 10-bit color space. But how much of a difference is there between 8- and 10-bit color space? The answer to this riddle isn’t 2 bits but rather 64 times more color values. Here is the math behind the numbers: 8-bit color has 256³ values, which means more than 16 million colors; while 10-bit color has 1024³ values, or more than 1 billion colors. Higher color values result in smoother color gradients, and are especially noticeable in scenes with say a big blue sky. In 8-bit, the sky tends to suffer from color banding while the 10-bit gradient is much smoother.
So 10-bit recordings can be a big step up from the typical 8-bit internal recording, but one can’t make assumptions that using an external recorder will always result in a 64x color space improvement. And while we are at it, you also need to consider the level of chroma sampling.
It used to be that video cameras recorded internally with 8-bit color, but some could output 10-bit externally over HDMI or HD-SDI. In two of my own workflows with the Sony FS5 and Sony A7sii, figuring out color space and chroma sampling is challenging. The TL;DR on internal vs. external recording for these workflows is the advantage of the external output compared to the internal recording is that the 4:2:2 external chroma sampling has twice the chroma information as does the 4:2:0 internal sampling. Also, the external intraframe codec with a higher bitrate has less compression and intraframe blur compared to the internal group of pictures codec. Below is the more complicated explanation, if you want additional details.
The FS5 can record HD internally at 10-bit 4:2:2 in XAVC 50Mbps mode, but only 8-bit 4:2:0 for 4K UHD. In HD, the HDMI outputs only 8-bit 4:2:2, but the HD-SDI can output 10-bit 4:2:2. In 4K UHD, there is no 6G HD-SDI option, as the HD-SDI is limited to 3G HD-SDI, so you are limited to the HDMI 8-bit 4:2:2 output if you want an external UHD 4K signal. In HD you can output only from either the HDMI or SDI at the same time and in 4K if you record internally, you have to choose between viewing the signal on your camera LCD or from the HDMI output on an external monitor—but not both at the same time.
The a7sii is simpler to understand but equally frustrating. Everything is 8 bit. 4:2:0 internal recording or 4:2:2 external output from the micro-HDMI port. In 4K, your LCD doesn’t show the video if you connect an external HDMI monitor.
So what is my take away in these workflows? My FS5 can record and output 10-bit color, but only in HD. And ultimately, I may not see much of a difference using an external recorder in this workflow because both the internal and external recordings would benefit from 10-bit 4:2:2 color. The difference between internal and external recordings is greater with cameras that are limited to 8-bit 4:2:0 but can output 10-bit 4:2:2 signals.
Despite there not being as dramatic gap in what my cameras can record internally vs. what it can output externally, I would however benefit from intraframe compression and a higher bitrate ProRes or DNXHD recording on an external recorder. In 4K/UHD, the difference between the internal and external is that my recordings would be the same with 8-bit color spaces, but the external still comes out ahead with better chroma sampling and a higher-bitrate intraframe codec.
Raw
If your workflows involve color grading, chromakeying, and working with scenes that have color gradients then you should care about these differences. But at the same time you might want to look into RAW workflows, including ProRes Raw on the Ninja V with the Nikon Z6, Z7, and S1H. ProRes RAW support on the Ninja V has been announced but has not yet been released at the time of this writing.
Audio Inputs/Outputs
The Ninja V audio inputs are limited to embedded 2- or 8-channel HDMI or 3.5mm line or mic-in options. Headphone monitoring is via a 3.5mm output. I go back and forth if I would have preferred to see a mini-XLR input option as full-size XLR is part of my standard workflow but considering both options would require me to use an adapter I don’t think it matters much. The 3.5mm input doesn’t support phantom power but that too doesn’t affect my workflows this far down the line as I would typically add microphones earlier in the workflow.
I have always appreciated how Atomos recorders allow me to select which audio inputs to monitor and record, VU meters to show me the levels, and level controls on my analog inputs (Figure 2, below).

Figure 2. The audio meters menu on the Ninja V allow you to record and monitor analog and embedded HDMI audio.
HDR Settings
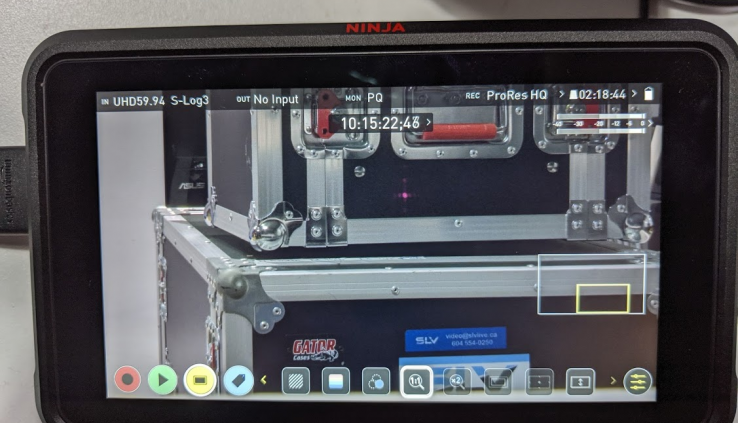
The HDMI 2.0 input accepts up to 2160p60 10-bit video. The Ninja V can detect on most cameras if the camera signal is HLG or PQ. This is helpful but the user still needs to select the proper PQ log gamma and gamut format from the available options and flavors of Sony S-Log, Canon C-Log, Arri Log C, Panasonic V-Log, RED LogFilm, FujiFilm F-Log, and Nikon N-Log (Figure 3, below).

Figure 3. The Ninja V set up to display a 4K UHD S-Log3 HDR image from the Sony Z280. The Z280 LCD is showing the flat log image without any gamma assist or LUT’s applied.
Once you have set up your camera input correctly, then you need to select the monitor standard so that you can properly expose your video and preview what it would look like on different types of playback devices. The options are Native (unprocessed), Rec 709 (SDR), HLG, and PQ (HDR).
Monitoring Tools
Navigating the Ninja V menu system is done via touchscreen (Figure 4, below). The menu system has a different look than what I am used to seeing on my other Atomos monitors, but it is still very intuitive. In addition to focus peaking and zebras, you can activate luma waveform, RGB parade, Vectorscope, Vectorscope Zoom, False Color, and Blue Only settings. I rely on these tools when I am matching cameras on multicamera shoots, and often I use my Atomos recorders to record the program output of my live-switched and webcast productions.

Figure 4. The Ninja V with Luma Waveform, focus, and peaking tools enabled.
Threaded Mounts
I like that there are two mounting options on the Ninja V. The main mount is a 3/8″-16 thread and it has a removable adapter with a smaller ¼”-20 thread. The larger 3/8″-16 is great for mounting on a light-stand while the smaller ¼”–20 is how I usually mount my monitors on an articulating arm or cold-shoe mount.
Media
In my first Ninja I used spinning 2.5″ laptop drives in the original obsolete Master Caddy. Then I graduated to 2.5″ SSDs in the Master Caddy II that were faster and didn’t drop frames when bumped. Both were in plastic Atomos Master Caddies and I sourced the drives myself with advice from the Atomos drive support list. I also have a G-Technology SSD in an aluminum Master Caddy 4K case. The MCII and MC4K both work in the Ninja V but because the Ninja V is so small, the old caddies stick out. It was too much for me to handle so I bought a 2 TB Sony AtomX caddy that is two inches shorter and looks the part (Figure 5, below).

Figure 5. The AtomX SSD is smaller than a traditional 2.5″ drive, which is what Atomos MasterCaddy drives are based on.
Atomos doesn’t ship a docking station with the Ninja V. In order to capture the footage from the Master Caddy or AtomX Caddy, you need to purchase a $75 docking station. I didn’t buy a new one as I have several from my other Atomos recorder monitors. But if I were going to buy a new one I would buy the USC-C 3.1 version. Ironically, I have this port on every one of my computers and laptops but few devices that actually use this faster standard.
AtomX
The battery slot on the Ninja V accepts Sony NPF-style batteries. AC power is possible with the Atomos Battery Eliminator that has a threaded DC tap for secure connections. The AC transformer is rather large and comes with the usual assortment of interchangeable international plugs. I don’t prefer interchangeable plugs because they create a potential failure point and weakness compared to a dedicated unit. The worst part is that I find that many custom Atomos cases with pre-cut foam made by third parties don’t allow you to store the AC adapters with the plug attached, which is frustrating. This is true for the HPRC 2300 hard case that was made for the Ninja V.
The battery plate is the only way to get power to the Ninja V as there is no dedicated DC tap. I do have many NPF 970 batteries but my other options include powering the battery eliminator with one of my Core SWX Powerbase Edge v-lock batteries, using a D-Tap-to-DC cable.
The battery plate also has two additional connection options. The AtomX Ethernet/NDI expansion module allows you to convert the Ninja V into an NDI transmitter or receiver and the AtomX SDI expansion module allows you to input or output 12G-SDI. These modules slide into the Ninja V battery plate and have their own battery plate so you can power both units from a single power source.
Overall, I am very pleased with the Ninja V as both a monitor and a recorder. The small size means I can leave it attached permanently on my main video camera, and it makes shooting in HDR more predictable. As a recorder, it sees equal duty when I need higher-quality recordings that will be graded or keyed and also as a program recorder on live switches and webcasts.