Changing the RAID settings on a G-RAID Studio (Win)
By Jim Bask
From G-Technology Knowledge Base
Download the Windows G-RAID configurator from the Downloads section. Once downloaded, run the file to install the G-RAID Studio Configurator. Please refer to the steps below on how to install and change the RAID setting. Keep in mind that changing the RAID setting will delete all the data on the drive.
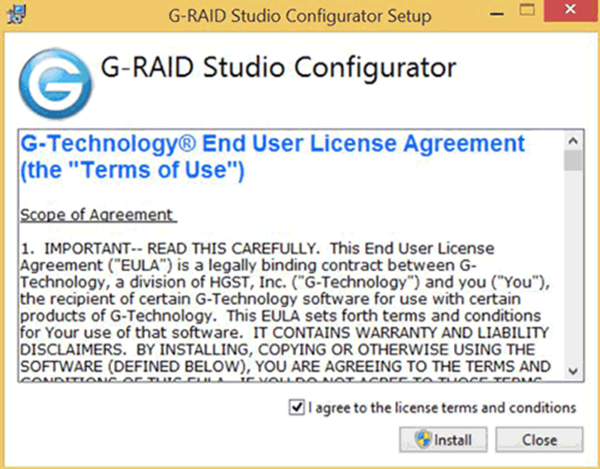
1. Double click on the file downloaded. the End User License Agreement will appear like on the screen below. Click on the box to check and agree to the license terms and conditions. Then click on Install to continue  . . |
|
|
|
2. The G-RAID Studio Configurator will install on the computer. |
|
|
|
3. Once installed, the following screen will show. Click on Close to finish the installation.
|
|
|
|
4. Once the software has been installed, click on the G-RAID Studio Configurator Icon located in the desktop. Once done, the screen below will appear. To change the RAID setting, verify that is says G-RAID Studio Thunderbolt as the device and click on Configure.
|
|
|
|
5. The RAID setting can now be choosen. Choose the desired RAID setting and click on Configure. (Make sure the G-Raid Studio is the only external storage device attached at this time.)
|
|
|
|
6. A warning message will appear stating that configuring the RAID will delete all the data. Click on Continue to continue.
|
|
|
|
7. Another warning message will pop up stating that this process will delete all the data. Click on OK to continue.
|
|
|
|
8. The G-RAID Studio Configurator will now be configuring the G-RAID Studio to the selected RAID setting.
|
|
|
|
9. Once completed, the screen below will appear. Now the G-RAID Studio will need to be formatted. How to format your drive for NTFS for Windows
|
Downloads for Windows Software to make installing your G-RAID STUDIO easier.
G-RAID Studio – RAID Configurator
G-Technology Windows Format Wizard
G-Technology Assistant Windows


