Review: Roland VR-1HD AV Streaming Mixer, Part 1: Basic Hardware Functionality
By Adam Noyes
In Part 1 of this 2-part review, Jan Ozer examines the essential hardware functionality, features, and usability of the Roland VR-1HD AV Streaming Mixer.
Roland’s VR-1HD ($1,495) is an inexpensive video mixing appliance that’s an alternative to software-based mixers like Wirecast or vMix. In this two-part series, we’ll look first at the basic hardware mixing capabilities of the VR-1HD, and then look at some advanced audio mixing capabilities, and features available when you connect the VR-1HD to a computer, including recording, streaming and some additional mixing functions.
As an overview, the VR-1HD mixes audio and video from multiple sources and sends a configurable webcam-like USB stream to a computer to push to a live streaming service. The unit has features appropriate for a broad base of users, including gamers and musicians, though my focus will be on more prosaic interviews and webinar-type productions.
Video I/O
The unit has three video inputs, all HDMI. Input 3 is a no-latency input with a passthrough to an HDMI output, so if you’re a gamer you can route your monitor output through the board with zero delay. Besides the Through output, there’s a Main output which displays the live audio and video feed and a Monitor input you use to control the menu options and configure the outputs. You can probably live without the Main output if you’re space-constrained, but you should set it up the first few times you run the unit to get familiar with what it does and how it works.
You can input audio from any of the HDMI sources. Besides that, there are two XLR/1/4″ combo jacks with phantom power and a line input via RCA connectors. Plus, the unit can accept audio via USB input from a computer.
The onboard mixer contains volume controls for the two mics and line input, but not for audio coming in with the HDMI signals or USB, though you can set levels for these via menu commands. You can listen in via a headphone jack, and send audio out to any monitor, plus line out via two RCA jacks, plus audio with the live USB feed.
Basic Video Switching
Figure 1 (below) shows the switching surface with the three video inputs on the bottom right. When running, the buttons for all live feeds are lit; red if the feed is currently live, white if available but not live. As you would expect, you switch through the feeds by clicking each button.

Figure 1. The VR-1HD switching surface
To the left of the three inputs is the Auto-switch button, which lets you select one of the four auto-switch options discussed in the second segment of this review. As with all configurable options, you choose and configure your options via the Setup box in the middle top, where the Menu button opens the menu and the Value knob lets you move through and select your options.
Above the video inputs is the Scene section, which lets you combine inputs via picture-in-picture or horizontal or vertical screen splits as shown below buttons A-E. The unit comes configured with the combinations shown below the buttons which you can customize to your liking by clicking the Scene Edit button and using the Value knob from the Setup section.
Configuring the Scene Settings
My basic configuration was two input cameras and a PowerPoint presentation coming in from a computer. Though I didn’t need to configure any of the inputs, the VR-1HD can zoom, scale, position, and adjust the brightness, contrast, or color values of any input.
To combine the inputs into the picture-in-picture shown in Figure 2 (below), you work with the buttons in the Scene box in the middle right of the switching surface (Figure 1). Click the button to configure (I used Button A for Figure 2) and then Scene Edit, which exposes controls that you work through using the Value knob at the top of the unit. Here you choose the background and foreground videos and can adjust the size, aspect ratio, cropping, zoom ratio, and position of the smaller window.

Figure 2. The Roland makes it easy to configure picture-in-picture shots like this one, with PowerPoint coming in via HDMI from a computer and the video coming in from a camera.
I configured Button A for the picture-in-picture shown in Figure 2 and Button C for a side-by-side shot of the two video feeds. During the production, the configured Scene buttons act like individual inputs that you switch to by pressing them, as you do with the three input buttons on the bottom right. So, if the host is input 1, the guest input 2, and a side-by-side combination that you’ve configured as input C, you would manually switch between the three shots by pressing input 1, input 2, or scene C, which transitions into the selected shot or scene. Very simple and very easy for a producer/performer to manage.
However, transitions were downright funky. For example, when switching to a composited video, the two videos comprising the composited shot never appeared simultaneously. So, if you transition from a single shot to a side-by-side composite, the videos in the side-by-side video appear at slightly different times. You can minimize this by shortening the transition time but you can’t eliminate it; even with a zero transition time, one video in the composited shot will appear before the other.
In addition, you have three transition options, either a mix fade (dissolve) or black fade (fade to and from black), or a cut if you set the transition time to zero. But only transitions to, from, and between composited scenes can be black fades; all others are mix fades or cuts. So, if you choose the black fade transition, when you switch from a camera input to a scene or scene to scene, you’ll get a black fade, but if you switch directly to and from camera inputs, you’ll get a dissolve or cut. You can configure a Scene to mimic a camera input and avoid this issue, but then you lose up to three scenes. Not a show stopper, but a bit unusual.
Titles and Still Images
You can create a title in any image editor so long as you output the file in 24-bit uncompressed BMP format. You can key out either black or white so I created the title shown in Figure 3 (below) as a 1920×1080 white image in Photoshop with the text and red background shown. You copy the title onto a USB stick, plug that into the back of the VR-1HD, load the image into the unit, and display the title by pressing the Key button on the upper right of the unit.

Figure 3. Inputting and displaying a title is simple enough.
This is simple enough in the hardware for a single title, but if you have to switch titles for the host and guest, you’ll have to work through the menu system to load the second title, which could be tough to do if you’re producing and performing. There is a software alternative for this that I’ll discuss in the next segment.
To display images in the presentation you have to assign them to an input channel, bringing the HDMI inputs down from three to two. You can load two images into the unit, but there’s no easy way to switch between them; you have to enter the menu system which, again, would be cumbersome if you’re both producer and on camera.
Overall, configuring and switching your video inputs will be simple for all users, even if you’re producing and performing. If your productions are image intensive you may wish to find a different alternative.
That’s most of the video side; now let’s look at audio.
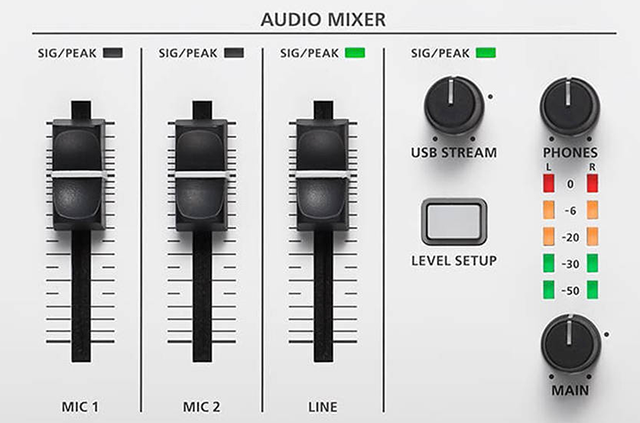
Audio Mixing
The VR-1HD manages audio on the left side of the control surface (Figure 4, below). Start by pressing the Level Setup button, which lets you set incoming dB levels for all inputs. You see the individual volume controls for Mic 1, Mic 2, and the Line input, plus output controls for the Main output, USB Stream, and headphones.

Figure 4. Audio mixing controls
In default mode, audio follows video, so if you have your mics connected to the cameras, only the audio from the currently selected camera makes it to the output channel. If that isn’t what you want, you can easily correct this via the menu system in the Audio Follows Video menu.
The unit comes with four audio effects that you can apply by clicking the buttons on the upper left of the panel. The voice changer lets you broadly adjust the voice, like male to female or vice versa. Background music (BGM) lets you play a loaded music file in the background, which is nice for atmosphere and breaks. Special Effects (SE) let you play a loaded audio file, with a polite applause track loaded by default. Reverb lets you apply the eponymous effect to the incoming audio.
Note that while you can apply reverb to any incoming audio track, you can deploy the voice changer only to inputs from microphones 1 and 2. More seriously, you can apply other audio effects like noise gate, compressor, limiter, and high-pass filter only to mics 1 and 2, though you can equalize all incoming audio tracks.
You can also apply some effects to the Main and Auxiliary audio bus outputs and the USB stream, including the ability to resync audio and video and apply echo cancellation to correct audio from a speaker picked up by a separate microphone. This is just an overview of the unit’s audio capabilities; if sophisticated mixing and control is critical to your use I suggest that you download the manual here and check for yourself.
Saving the Setup
Once you’ve completed your audio/video setup, you can save it to the USB memory stick so you can pick up where you left off for the next production. I’ll be using that feature to return to discuss the broadcasting and recording options, the VR-1HD software, and some advanced audio switching features.