REVIEW – TITLER PRO 5 FROM NEWBLUEFX
By Jim Bask
REVIEW – TITLER PRO 5 FROM NEWBLUEFX
As a Media Composer editor, I’ve been exposed to Titler Pro for a while now. When Avid added the ability to work in larger than HD projects, they licensed Titler Pro 2/2.5 to perpetual/subscription editors, as the Title Tool and Marquee Tool are not supported in larger than HD projects. At the time that Titler Pro 2 was released, it was a cool tool to use to create animated 2D and 3D titles inside of Media Composer.
Looking at it today, it’s showing it’s age, and many editors might not be willing to give the latest version of Titler Pro a try (version 5). In this article, I want to take an in-depth look at Titler Pro 5 (TP5), and show you why it’s a product that you need to put back on your radar.
Now, in this article I’ll be addressing more the Media Composer version of the plug-in, but keep in mind that the plug-in is supported in Magix Vegas, Resolve, Premiere, After Effects FCPX HitFilm, EDIUS as well as a standalone version you can use outside of the NLE’s.
WHICH VERSION IS RIGHT FOR YOU?
Titler Pro 5 comes in three different flavours, but before I move on and talk about the different editions, I want to talk about the other effects packages across the NewBlueFX (NBFX) product line. Now, you’re probably wondering why I would even bring this up in a review of TP5, and there is a simple reason for it. NewBlueFX has added the capability to add any of the effects and transitions product lines directly into TP5, meaning that you can now have effects like glows, etc right inside of TP5, which is a very cool feature.
NewBlueFX has added the capability to add any of the effects and transitions product lines directly into TP5, meaning that you can now have effects like glows, etc right inside of TP5, which is a very cool feature.
The more effects packages that are added by NBFX, the “bigger” TP5 can get! Now that we’ve gotten that out of the way, let’s talk about the packages.
Titler Pro 5 – $299
The standard edition. Comes with the application, the third party plug-ins for all the mentioned NLE’s and the standalone version.
Titler Pro 5 Elite – $399
The mid-range edition. Comes with the application, the third party plug-ins for all the mentioned NLE’s, the standalone version and the Classics (40 Title Styles) and GraphPax which includes 12 lower thirds, both of which are a $59 value.
Titler Pro 5 Ultimate – $499 US
The top of the line edition. Comes with everything mentioned above AND:
- Fluid Motion Pack ($59)
- OnAir Collection ($59)
- PowerMotion Collection ($59)
- PrimeTime Collection ($59)
- Social Media Collection ($59)
- Sports Graphics Collection ($59)
- Reflections Collection ($59)
- After Effects Support ($99)
Now, keep in mind that all of these add-ons are titling related, not effects related. They are all different lower third template packages that are instantly accessible in TS5. For me, the big reason to pick up the Ultimate version is quite simply for the After Effects plug-in, to let you use TP5 in After Effects.
For me, the big reason to pick up the Ultimate version is quite simply for the After Effects plug-in.
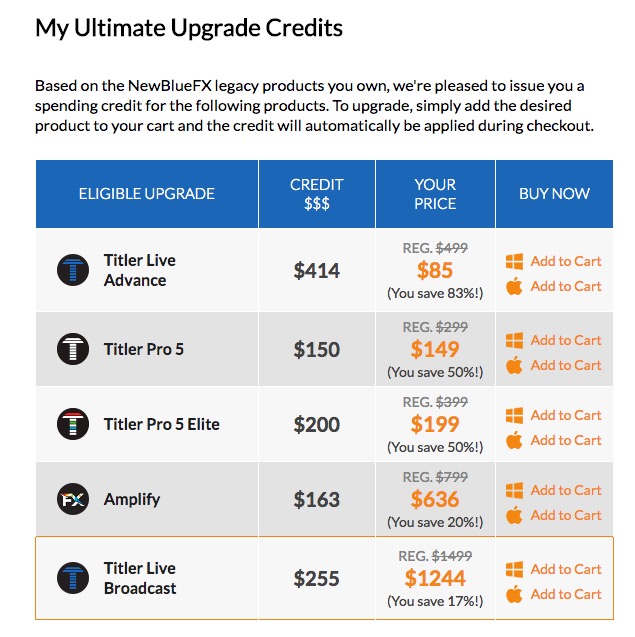
There’s something else quite interesting that I want to point out about how the upgrade plan works. You can get discounts based on how many legacy NPFX products you own (basically, an upgrade path). As per their website:
Based on the NewBlueFX legacy products you own, we’re pleased to issue you a spending credit for the following products. To upgrade, simply add the desired product to your cart and the credit will automatically be applied during checkout.

So if you’re looking for the TP5 Standard package, you could potentially get the newest version for half price.
GETTING STARTED
Normally, when working with TP5, no matter which application I’m working in, I prefer to add it to a secondary layer, above the layer that I want the text/text animation to appear on, just so I have more control over the effect. Again, we’re using Media Composer in this article, but the concept will be the same across all the NLE’s and compositing applications.

Once you’ve applied the effect to your timeline, the timeline will process for a few seconds, and then the TP5 interface will appear.
Read the full article here.

