Using NDI with Microsoft Teams
By Adam Noyes
Video conferencing saw an undeniable surge in popularity in the streaming space during 2020- largely due to the Covid-19 Pandemic. One popular solution of video conferencing was Microsoft Teams, and a requested feature that was promised earlier this year was NDI within Teams.
This feature is finally here, and Microsoft has released a quick guide on how to integrate the NDI capability to your Teams call.
Check out some highlights from that guide, below.
Network Device Interface (NDI) allows you to broadcast the audio and video streams from a Teams meeting to your local network.
When using NDI in a Teams meeting, you will have unique video steams on the network that can be used in your own production.
Turning on NDI in Teams
First, NDI-out needs to be turned on for each individual user by an admin. Once NDI-out has been turned on, a new option will become available in Teams.
Note: An admin for the user’s tenant can use cmdlets or the admin portal to enable NDI-out.
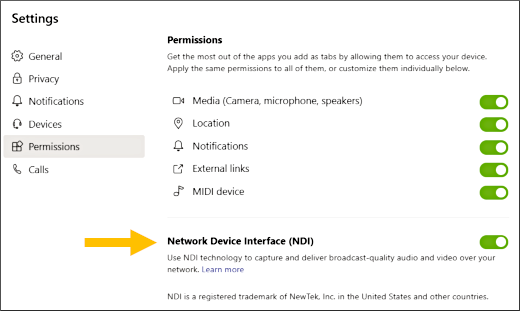
Next, go to your user profile picture in the upper-right of Teams and choose Settings. Then select Permissions and turn on the toggle next to Network Device Interface (NDI).

After enabling NDI in Teams, all meetings that you join will have streams available via NDI over your local network. When you join a meeting in the Teams desktop app, you will be notified that broadcasting capabilities are turned on.


