The Easiest Way to Stream Your Timeline – Premiere, AVID, and FCP X
By Jennifer P

In a recent article posted by Sofi Marshall, they discuss how to easily stream your timeline for real-time remote editing using just a few simple tools. The vast majority of these collaboration platforms are built on the same (mostly) free software that anybody can set up.
Is streaming your timeline better than screen sharing?
It’s much superior! Don’t get me wrong, screen sharing has advanced greatly in recent years as well, but by employing this approach, you’ll receive better footage, good audio/video sync, and considerably less lag. Once you grasp the fundamentals, it is also very configurable.
Newtek’s NDI Tools
A strong video-over-IP protocol is NDI. NDI transmits a high quality, low latency video feed over your local network that can be picked up by a variety of software and hardware, as opposed to needing cables or other gear to move video from point A to point B.
Since NDI’s capabilities are so diverse, I advise looking into further intriguing NDI integration strategies for your video production. (Newtek did not fund this article.)
Why then didn’t I use NDI in my initial post on real-time remote editing if it’s such a terrific tool? The NDI NLE plugins were brand-new at the time and fell short of my standards for dependability and stability.
But three years and a few software versions later, and NDI has my enthusiastic stamp of approval!
Install NDI Tools
Download NDI Tools for Mac (or Windows) from the NDI website.
When prompted, launch the installer package and restart your computer.
Everything you need to stream your timeline from Premiere, After Effects, or FCP X is included in NDI Tools.
The Avid NDI plugin is included with Media Composer versions 2018.7 and higher by default (unless you actively deselect it), but you still need to install the NDI Tools to get started.
Avid Media Composer
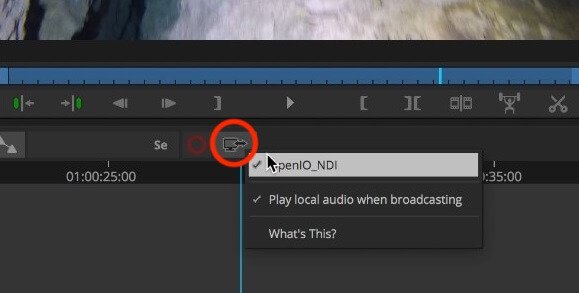
With your project open in Avid Media Composer, first locate the HW/SW icon above the timeline, right-click it, and check that “OpenIO_NDI” and “Play local audio when broadcasting” both have a checkmark next to them. Then simply click the HW/SW button. The arrow will blink red to indicate an active NDI stream.

Activate NDI Virtual Input to stream your timeline
Just one last, but very important, step before we can pick up our NDI video stream in Zoom – we need to activate it as a virtual camera.
NDI Virtual Input (NDI Webcam on Windows) is one of the apps that installs with the NDI Tools package. Locate it in your applications folder and open it up.
There’s not much to this app on MacOS. It’s really just a top menu bar.
Navigate to the NDI menu, then select your computer, and then select your NLE as your NDI source. Avid and FCP X may shows up as macOS AV Output.

Keep the app running in the background while you’re streaming, and don’t forget this step each time you want to stream your timeline!
Tip: If you’re ever faced with a blank NDI video screen in Zoom, forgetting to set the NDI Virtual Input is most likely the culprit.
Read the full article from Sofi Marhsall HERE
Learn more about Avid Media Composer HERE
Learn more about Avid HERE
Learn more about NDI HERE

